
TL;DR:
- Effective streetwear photography relies on selecting strong silhouettes, layered textures, and purposeful accessories to create compelling images. Planning diverse shot types in advance and utilizing natural lighting enhances fabric detail and overall visual appeal. Prioritizing quality pieces, natural poses, and contrasting environments results in authentic, shareable streetwear content.
Streetwear photography styling tips are the techniques, outfit selections, and posing strategies that transform urban fashion into compelling, shareable images. The difference between a flat product shot and a photo that stops the scroll comes down to silhouette, texture, and attitude. Whether you are shooting for a lookbook, social media, or an e-commerce catalog, the choices you make before the shutter clicks determine everything. This guide covers the exact methods that photographers and streetwear enthusiasts use to create images that feel authentic, not staged.
1. streetwear photography styling tips: start with the right outfit components
The foundation of any strong streetwear photo is the outfit itself. Silhouette-defining pieces like structured jackets, oversized tees, and tapered cargo pants create the visual contrast that cameras love. Flat, shapeless fits disappear on screen. Bold shapes hold attention.
Layering is the single most powerful tool in your styling kit. Combining materials like denim, leather, nylon, and knitwear creates what photographers call micro highlights, the small pockets of light and shadow that give an image depth. A heavyweight graphic tee under an open nylon track jacket reads completely differently than either piece alone.
Accessories are not optional. Caps, chains, crossbody bags, and embroidered details give the camera focal points to land on. Without them, the eye has nowhere to travel in the frame.
- Choose one statement piece per look and build around it
- Mix at least two contrasting textures in every outfit
- Add one accessory at the neck, one at the waist or hand, and one on the head
- Keep the color story tight: three tones maximum per look
Pro Tip: Avoid styling an outfit with more than three dominant colors. The 60/30/10 color rule assigns 60% to a dominant tone, 30% to a secondary, and 10% to an accent. This creates visual cohesion without making the image feel flat.
2. build a shot list before you shoot
A professional streetwear session needs structure. At least six shot types should appear in every lookbook: full body front, full body side, walking, seated, fabric close-up, and accessory detail. That variety gives you assets for Instagram feeds, TikTok, Stories, and e-commerce product pages from a single session.
Shoot in both vertical and horizontal formats. Vertical fills a phone screen on Stories and Reels. Horizontal works for website banners and catalog layouts. Capturing both during the same shoot saves you from reshooting later.
| Shot Type | Best Platform Use |
|---|---|
| Full body front | E-commerce product page |
| Full body side | Lookbook editorial |
| Walking or movement | Instagram Reels, TikTok |
| Seated or leaning | Feed posts, Pinterest |
| Fabric close-up | Product detail pages |
| Accessory detail | Stories, carousel posts |
Plan your sequence before you arrive on location. Start wide and work inward. Full body shots first, then medium shots, then close-ups. This keeps the session moving and prevents you from missing key details at the end when energy drops.
Pro Tip: Write your shot list on your phone notes and check off each type as you go. Missing a close-up of a key texture or accessory is one of the most common and most costly mistakes in streetwear photography.
3. how lighting shapes streetwear photos
Lighting is not just a technical decision. It is a styling decision. Natural light at golden hour or from a large window brings out fabric texture and creates a cinematic warmth that flash rarely replicates. That soft, directional light wraps around denim and leather in a way that makes materials look expensive.
Harsh midday sun flattens texture and blows out highlights on light-colored pieces. Avoid it unless you are deliberately chasing an editorial, high-contrast look. If you must shoot midday, move into open shade.
- Golden hour (first hour after sunrise, last before sunset): Warm, directional light that flatters all skin tones and fabric types
- Overcast sky: Soft, even light with no harsh shadows, ideal for showing true color and detail
- Window light indoors: Controllable, consistent, and great for close-up texture shots
- Urban artificial light (neon, streetlights): Creates mood and edge for night shoots
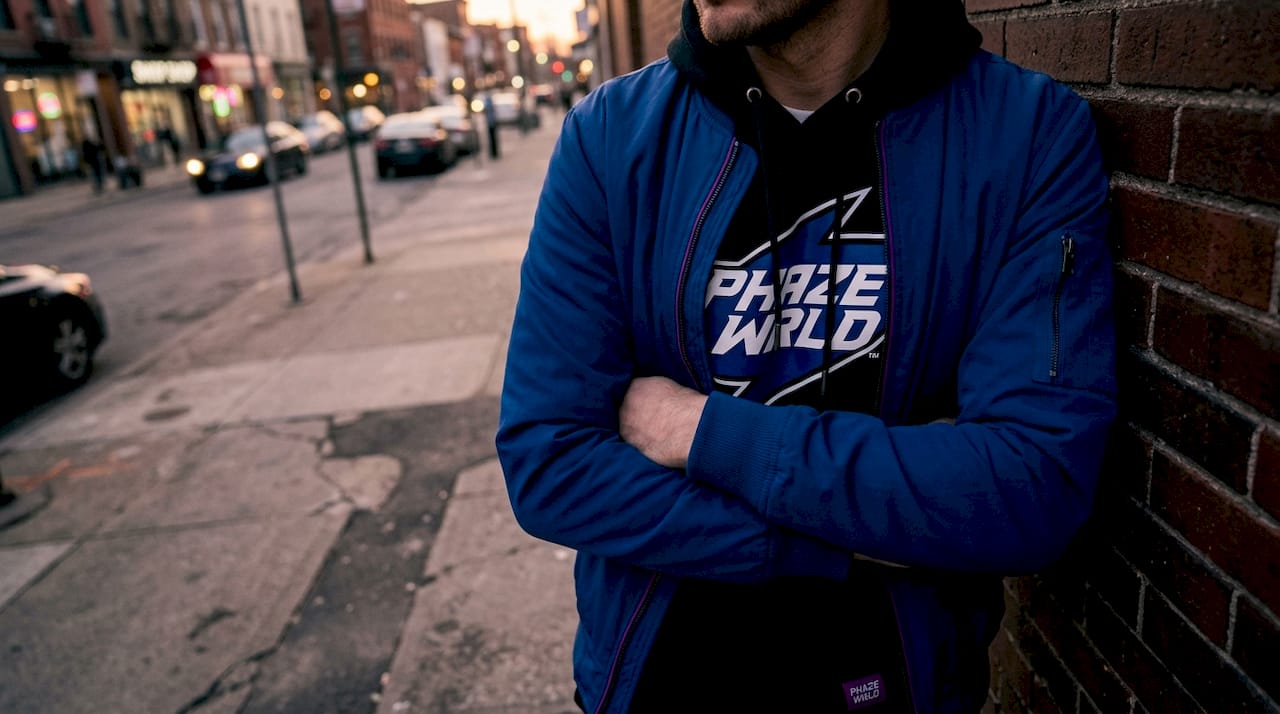
Backdrop choice matters as much as light direction. A dark outfit needs a light or mid-tone background to read clearly. A white or cream fit pops against a concrete wall or a dark brick surface. The rule is simple: contrast the outfit against the environment so the silhouette stays sharp.
4. streetwear posing tips: let the outfit lead
The pose exists to serve the outfit, not the other way around. Streetwear posing works best when it feels like the subject was caught mid-thought, not directed into a shape. The goal is attitude with intention.
Anchor every pose with a hand placement. Thumbs in pockets, fingers on a jacket collar, or one hand adjusting a cap all create intentionality without looking forced. These small anchors give the subject something to do with their hands and prevent the stiff, arms-at-sides look that kills energy in a photo.
“The pose should revolve around the outfit, preserving the silhouette by using subtle positioning rather than exaggerated movements.” — streetwear posing research
Weight shifts are your best friend. Shifting weight to one hip, taking a half step forward, or lifting one heel slightly creates a dynamic silhouette without requiring the subject to perform. Natural micro-movements like a glance over the shoulder or a slow walk toward the camera add visual momentum and help viewers imagine wearing the look themselves.
- For oversized fits: use wide stances and relaxed arm positions to show volume without hiding shape
- For fitted pieces: stand slightly angled to the camera to emphasize cut and proportion
- Looking away from the camera reads as candid and editorial
- Direct eye contact reads as confident and brand-forward
5. choosing urban environments that work for streetwear
Location is part of the styling. Oversized streetwear outfits look most dynamic in urban environments like city streets, rooftops, parking garages, and graffiti walls. These settings reinforce the cultural context of the clothing and make the image feel lived-in rather than produced.
Match the environment to the outfit’s energy. A clean, minimal fit works in a stark concrete space. A layered, graphic-heavy look benefits from a textured or colorful backdrop that matches its complexity. The location should amplify the outfit, not compete with it.
Consider how the seasonal wardrobe of your subject interacts with the setting. A heavy winter layering look shot in front of a sun-bleached wall creates visual tension. A light summer fit in a shadowed alley does the same. Intentional contrast between outfit and environment creates images that feel considered.
Pro Tip: Scout your location before the shoot day. Check the light at the time you plan to shoot, identify your best angles, and note any distracting background elements you will need to avoid or work around.
6. color palette strategy for styling streetwear shoots
Color is the first thing a viewer registers before they read a brand name or recognize a silhouette. The 60/30/10 rule is the most reliable framework for building a cohesive color story in streetwear photography. Too many competing colors pull the eye in multiple directions and weaken the image.
Flat, single-color outfits need contrast to stand out. A black hoodie against a black wall disappears. The same hoodie against a warm-toned brick or a pale concrete surface reads clearly and with impact. Color contrast between outfit and backdrop is not a preference. It is a technical requirement for legible images.
When styling for social media, think about how the color palette reads as a thumbnail. Bright accent colors on a neutral base outfit tend to perform well because they catch attention at small sizes. Earth tones and monochromatic looks read as editorial and tend to perform better in longer-form content like lookbooks and editorial spreads.
7. common mistakes that undermine streetwear styling in photos
The most common mistake in streetwear photography is prioritizing hype over quality. Investing in well-made pieces with strong construction and interesting textures produces better images than stacking logo-heavy items that compete for attention. Hype fades. Craftsmanship photographs well in any era.
Letting the model overpower the outfit is the second most common error. The subject’s expression and energy should support the clothing, not distract from it. A strong pose that hides the jacket’s silhouette or a facial expression that pulls focus from the layering defeats the purpose of the shoot.
Footwear is an underused styling tool. Sneakers are the default in streetwear, but rotating in boots, loafers, or sandals creates variety across a lookbook and signals a more evolved aesthetic. Styling versatility across a shoot keeps the content from feeling repetitive.
- Do not over-accessorize. Three focal points per look is the maximum
- Avoid ironing or steaming garments into stiffness. Lived-in texture reads better on camera
- Do not ignore the back of the outfit. Back shots reveal construction details that front shots miss
- Avoid matching every element too perfectly. Intentional contrast signals personal style
Pro Tip: Shoot at least one back-facing or profile shot for every look. Garment construction, back graphics, and silhouette from behind are details that buyers and followers notice and that most photographers skip.
Key takeaways
Strong streetwear photography requires outfit selection, posing, lighting, and location to work together as a single system, not as separate decisions.
| Point | Details |
|---|---|
| Outfit components first | Build looks around silhouette-defining pieces with layered textures and purposeful accessories. |
| Plan a six-shot minimum | Cover full body, walking, seated, and close-up shots to serve every platform format. |
| Light shapes the material | Use golden hour or window light to bring out fabric texture and avoid flat midday sun. |
| Pose to serve the outfit | Use weight shifts and hand anchors to create natural, dynamic silhouettes without overacting. |
| Quality over hype | Timeless, well-crafted pieces photograph better and produce content with longer shelf life. |
What years of shooting streetwear actually taught us
The conventional advice says to find a great location and let the outfit do the work. That is half right. The location matters, but the real work happens in the ten minutes before you start shooting, when you adjust the collar, check the layering, and decide which accessory stays and which one goes back in the bag.
At Phazewrld, we have seen shoots fall apart because the styling was assembled on the day with no clear vision. We have also seen simple outfits, a heavyweight tee, cargo pants, and a cap, produce some of the most shared content we have ever put out. The difference was always intention. Every element in the frame was there for a reason.
The shift toward quality over hype is real and it shows up in the data. Pieces with strong construction, interesting stitching, and considered silhouettes photograph better across every lighting condition. A logo-heavy look can work, but it requires the rest of the image to be dialed in perfectly. A well-layered, texture-rich outfit is more forgiving and more versatile across a full shoot day.
One thing most guides skip: document your lookbooks consistently. Shoot the same outfit from the same angles every season. That consistency lets you track how your styling evolves and gives your audience a visual language they recognize. Trends shift. Your eye for silhouette and texture is what stays.
— Phazewrld
Build your next shoot with Phazewrld
The right pieces make every styling decision easier. Phazewrld carries men’s streetwear and women’s streetwear built for exactly the kind of shoots this guide covers: bold silhouettes, layerable textures, and accessories that give the camera something to work with. From streetwear hoodies that photograph well in any light to caps and headwear that add the finishing focal point, every piece is designed to hold up on camera and in the culture.

Free shipping on orders over $99, easy returns, and price matching mean you can build out a full shoot wardrobe without the risk. Browse the collections and start styling with pieces that were made to be seen.
FAQ
What are the core streetwear photography styling tips?
The core tips are selecting silhouette-defining pieces, layering contrasting textures, planning a shot list with at least six shot types, and using natural light to bring out fabric detail. Posing should serve the outfit, not compete with it.
How do i choose the best poses for streetwear photos?
Anchor poses with hand placements like pockets or jacket collars, use subtle weight shifts for dynamic silhouettes, and shoot movement shots like walking or a glance over the shoulder for natural energy.
What lighting works best for streetwear photography?
Golden hour and window light are the most reliable options because they emphasize texture and create depth. Avoid harsh midday sun unless you are deliberately chasing a high-contrast editorial look.
How many outfit shots should i capture per look?
Shoot at least six shot types per outfit: full body front, full body side, walking, seated, fabric close-up, and accessory detail. This gives you assets for every platform format from e-commerce to social media.
Does color balance matter in streetwear styling?
Color balance is critical. The 60/30/10 rule assigns a dominant tone, a secondary tone, and a small accent color to keep the image cohesive. Too many competing colors reduce visual clarity and weaken the overall impact of the shot.